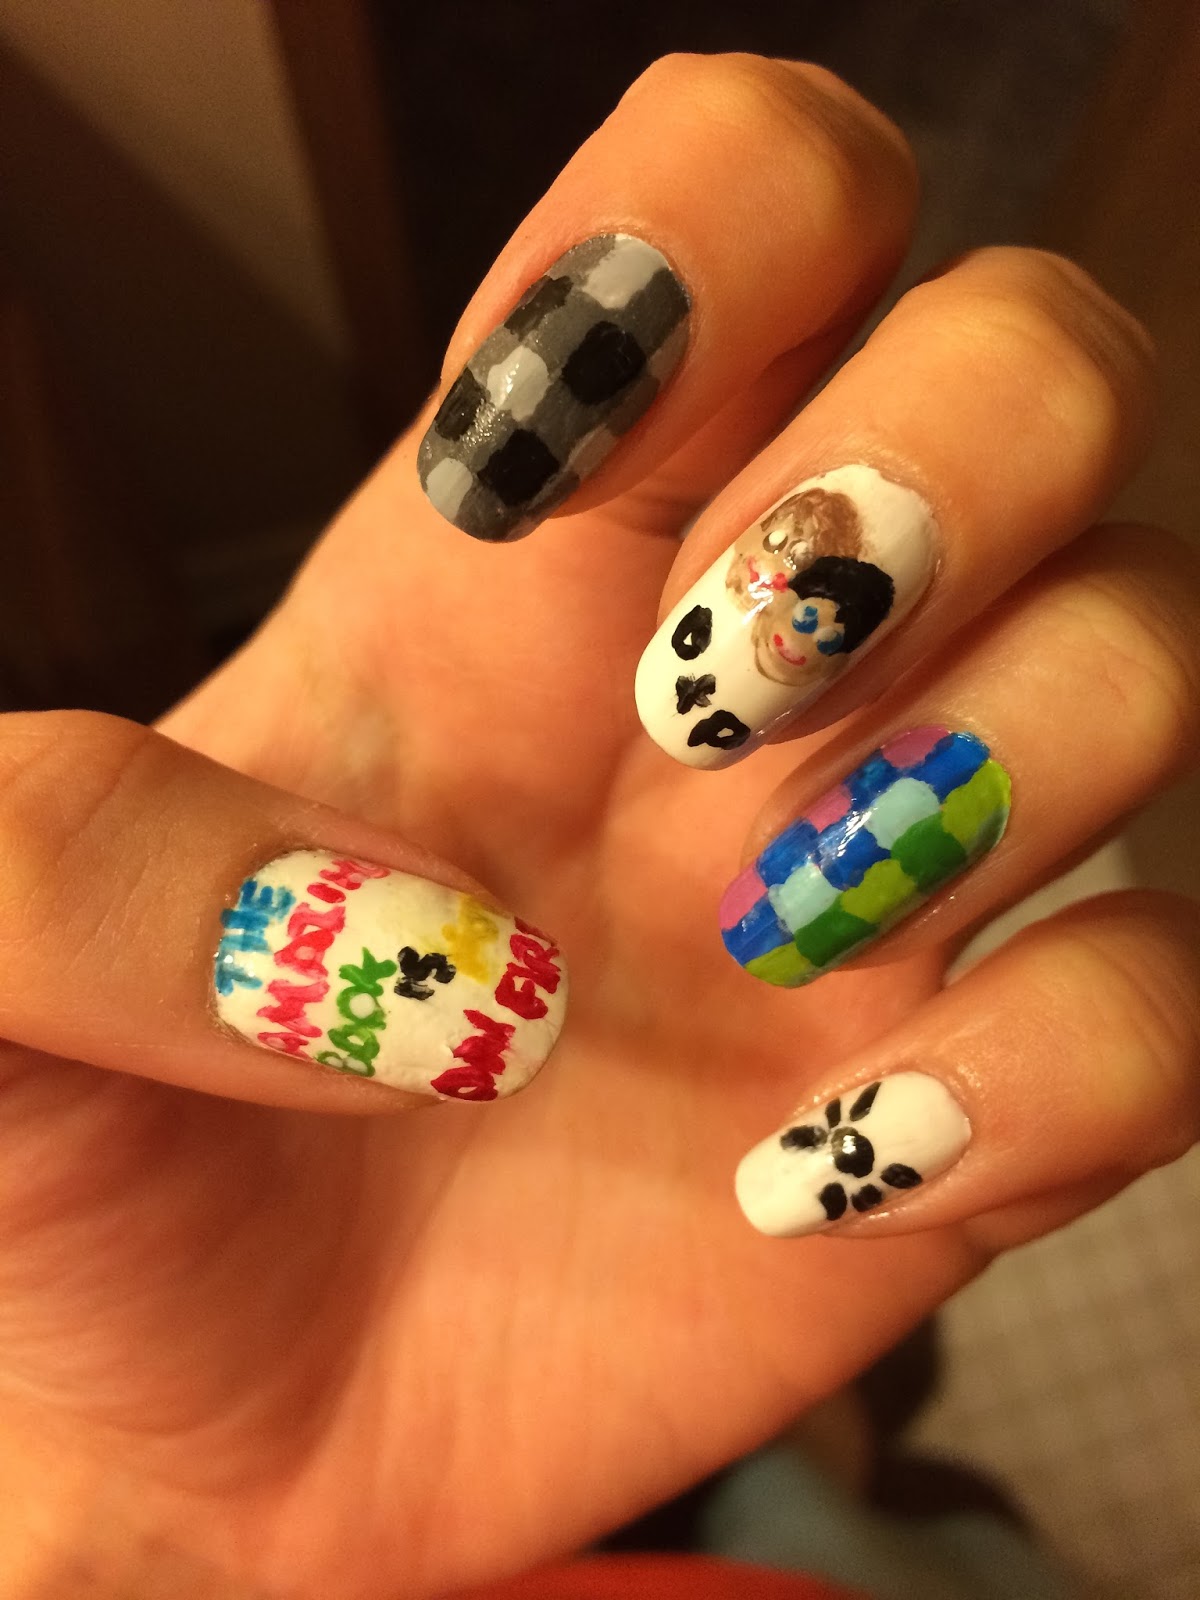
Dan and Phil TATINOF Nails


Hello! It’s been forever hasn’t it, but today I have a very special nail design to share with you guys. I am meeting Dan and Phil as of tomorrow and in order to celebrate the occasion I did some nail designs inspired by them (and with the help of Pinterest obvs). I used a lot of nail polishes for this so I am just going to make a huge list below.


Nail polishes used: 

On all nails- Revlon Base + Top Coat, Sally Hansen’s Miracle Gel “Get Mod” (#789)

On my thumb-  Blackheart Beauty “Deep Sky Blue”, Sally Hansen’s Miracle Gel “Pink Tank” (#220), Insta-Dri “In Record Lime” (#50), Insta-Dri “Black to Black” (#360), Opi “Primarily Yellow”, and Insta-Dri “Rapid Red” (#280). 

On my index finger- Insta-Dri “Black to Black” (#360), Candie’s “Concrete Jungle” (#2191), and Wet n Wild “Tough Girl” (#34206).
On my middle finger- Insta-Dri “Black to Black” (#360), Insta-Dri “Sand Storm” (#113), Essie “Mink Muffs” (#624), Blackheart Beauty “Deep Sky Blue”, and Miracle Gel “Pink Tank” (#220).
On my ring finger- Blackheart Beauty “Deep Sky Blue”, Insta-Dri “Blue-Away” (#425), “Lively Lilac” (#420), “Lickety-Split Lime” (#450), “In Record Lime” (#50), “Jade Jump”(#450), and “Mint Sprint” (#440).
On my pinky- Insta-Dri “Black to Black” (#360)

Now I’ll walk you through how I did each design which, in total, these took me a couple hours to do because I had to wait for stuff to dry and messed up a LOT. It isn’t that complicated it just takes a steady hand and small brushes.
For all of my nails I started with a base coat to protect my nail and then two coats of white polish. For my pinky I did a simple cat whisker design in black using a small brush to draw it on. That was the easiest nail to do lol. I also did this design on the pinky and thumb of my other hand.
For the index and ring fingers I decided to do Dan and Phil’s bed covers which were a bit more difficult (especially Phil’s omg so many colors). What I did was I chose one color and drew 3 vertical lines and 4 horizontal lines that way I would have a guide line of where to put the colors. I did this using a long skinny paint brush btw. Then I just googled reference pictures and put the closest colors I had within the guidelines. I definitely recommend doing a guide rather than free handing the colors.
For the middle finger I decided to go with the Dan and Phil emoji that was used for their twitter hashtag during the Brits. I had a screenshot of it on my computer so I just stared at it and tried my best lol. That’s all you can do really. I outlined everything in my dark brown first (using a skinny brush) and then drew the hair, filled in the skin color, drew the mouth, and used a bobby pin to dot the eyes. After I finished the design I noticed there was a lot of space left so I added D+P underneath in black.
For the final design I decided to write The Amazing Book Is Not On Fire in the same colors as the book cover. This was by far the hardest one to do and I messed up so many times; I almost gave up. Basically all you have to do is write it but it takes full concentration and you have to make sure not to make the words to big.
After all the design were done I cleaned up my nails then waited a whole day before adding the top coat because I really didn’t want to risk the polish bleeding and ruining everything. I filmed this whole thing so expect a video on my YouTube channel (if it’s not up already). Also if you haven’t seen my last video, which is also Dan and Phil related, then watch that because it’s fun. I’ll make sure to write a blog post about the tour and my experience and possibly other blog posts will be coming in the future. I hope you enjoyed this design :) BYE

Comments

Post a Comment

Popular posts from this blog

Firework Nails

Hello everyone! If you live in America then tomorrow is an exciting day for you, full of celebration. With that celebration comes amazing fireworks. So, without further a do here are my Independence Day firework nails. The polishes I used were Sally Hansen's "Co-balt Blue" (#320), "Red My Lips" (#470), "Silver Sweep" (#230), and "Grape Shifter" (#423), NYC's "French White Tip" (#134), and Blackheart Beauty's "Deep Sky Blue". I also used a nail dotter to create the fireworks. I started by painting the base colors on my nails, alternating the colors on each finger, and letting that dry. I chose to do my fireworks on the navy blue nails, but you can do them on the red or even on all the nails if you choose. For the fireworks I started with a dot for the center of the firework and added a red star there. Remember, the center of the firework does not have to be in the center of the nail (I only did that on one nai...

Miracle Gel Swatches

Hey guys! I know this post is late, but now that school has started back up all I ever do is homework. It's ridiculous I don't do anything anymore (not that I ever did lol). Anyway enough excuses. I did these swatches forever ago, like October of last year, so my memory of these colors are a distant memory. However, I didn't have a post planned so I thought I would show you these. The deep red color is "Wine Stock" (#480). I really like this color and it would be a great holiday nail color. However, because I love red nail polish, especially deep red, I will wear this whenever I want. As every other Miracle Gel polish I own, this is a great polish. I believe this was only one coat as well which is super cool. The other color is "All Chalked Up" (#230) and it is a pastel purple color. This color is very light-hearted and cute looking which I appreciate when it is dreary outside and I get sad. This is also a great Easter color (apparently I l...

Miracle Gel "Game of Chromes" Review

Hello everyone! I recently purchased another nail polish from Sally Hansen’s Miracle Gel collection called “Game of Chromes” (#510) and I thought I’d write a review for it today. Frist of all, the name is genius. Secondly, lol, the color is gorgeous. It is really shiny and when you move your fingers under the light it kind of looks like it switches between silver and gold, like a hologram or something. It is just a really nice color if you are looking for a solid nail design that isn't super boring. I also really liked the formula of the polish. It went on very smoothly (just like the others from the line did) and it was opaque with one coat. When I used the top coat (which you have to buy separately unless you get a kit and it’s expensive but whatever), it lasted a long time with no chips. It still isn’t chipped and I could keep it on, but I redo my nails every week lol. That is all for today, but you can check out my most recent YouTube video here, or look through...